Rollator LED Front Light 1000 Lumen Rechargeable

LED Front Light – Compact, Powerful, and Safe

SKU: 11-90-034
Stock Status: In Stock
Delivery Status: 3-5 working days
A$ 126
Excluding Tax
pcs

Rollator LED Front Light 1000 Lumen with Rechargeable Battery

Purpose:         To see
Light power:   1000 Lumen

Upgrade your rollator with the Rollator Front Light 1000 Lumen, a compact yet powerful lighting solution designed specifically for those on the move in the evening and winter dark. With a maximum output of 1000 Lumen, this LED front light ensures exceptional visibility, perfect for early morning or nighttime use, enhancing both safety and convenience. Engineered with an anti-glare design and a wide-viewing angle, the LW-F1000 provides optimal lighting for you without blinding others, making it ideal for you and the safety of pedestrians and cyclists around you.

The light is built to endure even the harshest conditions. Rated IPX6 for water resistance, it’s perfect for withstanding heavy rain and rough weather, keeping you safe and secure during any outdoor journey. The high-quality aluminium alloy construction ensures durability while maintaining a sleek and lightweight design, finished in a stylish matte black with hard anodizing for extra protection.

Equipped with a Type-C USB charging port and a 4000mAh 21700 Li-ion battery, the LW-F1000 charges fully in just 5 hours and operates for extended periods. With multiple modes—ranging from 100% steady at 600 lumens (3.5 hours + 1 hour safe mode) to SOS and slow flash modes (14 hours)—you can tailor the brightness to your needs. For maximum power, a double-click activates the Ultra Bright Mode, delivering 1000 lumens for 2.5 hours, perfect for low-light environments. The mode memory function saves your last setting, making operation simple and efficient.

Additionally, the Rollator Front Light doubles as a power bank with a USB-A output, allowing you to charge your devices on the go, a great feature for users needing extra power for phones or other electronics.

Smart Safety Features:

  • Safe Mode: When the battery runs low, the light automatically switches to a 50-lumen safe mode, providing an additional 30 minutes of illumination to ensure you reach your destination safely.
  • StVZO standard lens: Certified for anti-glare and precise beam direction, meeting the highest safety standards.

Max light power: 1000 Lumen
Color Temperature: 5000K
Battery Capacity: 4000mAh
Modes & Runtime: 5 modes, including Ultra Bright (1000 Lumen), steady (600-150 Lumen), and flashing options
Charge Time: 5 hours
Size: 113mm (L) x 33mm (W) x 33mm (H)
Weight (w/ bracket): 220.5g
Waterproof Rating: IP65

User Guides

The documentation for this product includes the manuals and instructions listed below. You can choose to view the documentation online or download it for local use.

1000 Lumen Trionic LED Front Light

This manual both shows how you attach the light holder and the light on a Walker (left column below) and also how you attach them on a Veloped (right column below).

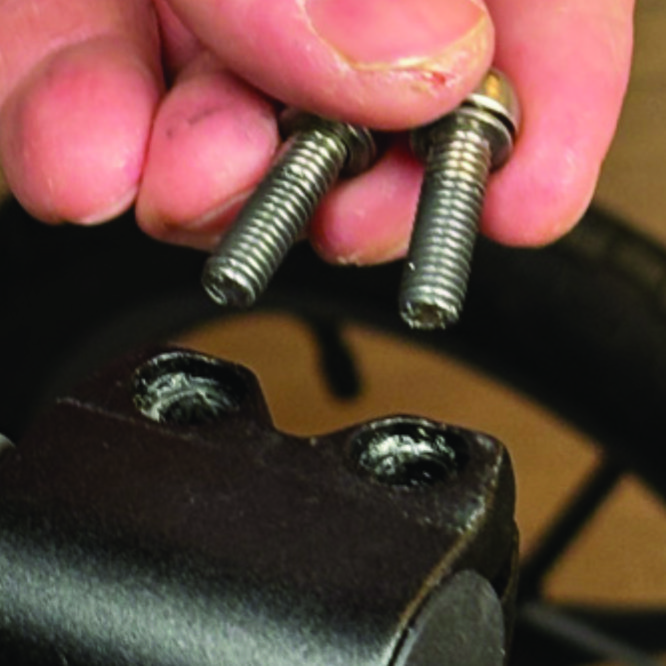
In the left-hand photo, A shows the holder attachment parts for a Walker (2 screws + 2 washers). B shows the holder attachment parts for a Veloped (1 screw + 1 knurled nut + 1 nut).

1000 Lumen Trionic LED Front Light

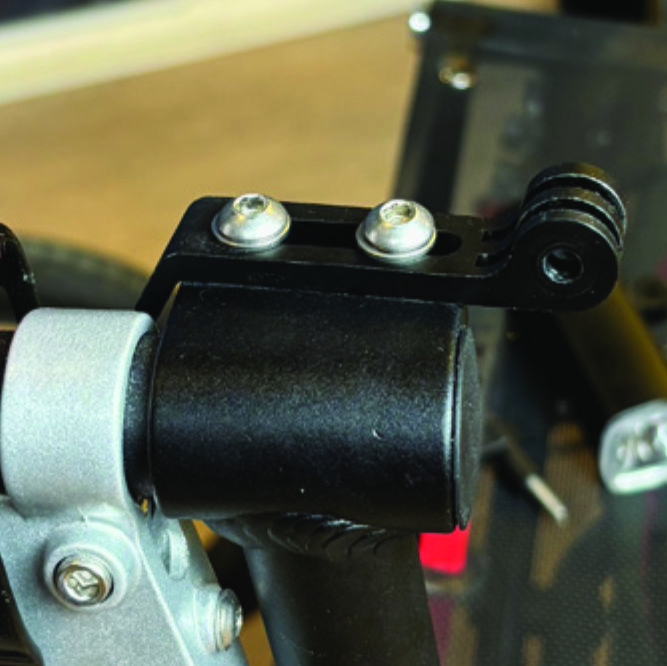
Attaching the Light Holder

Instructions for a Walker

On top of the black semi-vertical tube, locate the two screws that clamp the grip tube, situated in front of the brake lever.
A1. On top of the black semi-vertical tube, locate the two screws that clamp the grip tube, situated in front of the brake lever.
Loosen both screws with the 5mm allen key included with the LED light.
A2. Loosen both screws with the 5mm allen key included with the LED light.
Remove the two screws from the grip clamp.
A3. Remove the two screws from the grip clamp.
Place the light holder on top of the grip clamp, with its circular and slotted light attachment pointing forwards and upwards. Enter the two screws with washers into the holes of the clamp.
A4. Place the light holder on top of the grip clamp, with its circular and slotted light attachment pointing forwards and upwards. Enter the two screws with washers into the holes of the clamp.
Tighten the two screws with the 5mm allen key. NOTE: It is important that you tighten the screws properly as they secure the grip tube with its rubber grip and brake lever.
A5. Tighten the two screws with the 5mm allen key. NOTE: It is important that you tighten the screws properly as they secure the grip tube with its rubber grip and brake lever.

Instructions for a Veloped

Locate the screw at the center folding hinge of the U-shaped grip bar of the Veloped. Unscrew the screw with the included 4mm allen key and remove it.
A1. Locate the screw at the center folding hinge of the U-shaped grip bar of the Veloped. Unscrew the screw with the included 4mm allen key and remove it.
Replace the old screw with the longer screw included with the LED light. Attach the longer screw to the hinge and tighten it with the 4mm allen key.
B2. Replace the old screw with the longer screw included with the LED light. Attach the longer screw to the hinge and tighten it with the 4mm allen key.
Attach the short angled end of the light holder to the lower end of the screw, on the downside of the U-shaped grip bar. The holder should point downwards. Fasten the holder with one washer and the knurled nut that you tighten with your fingers.
B3. Attach the short angled end of the light holder to the lower end of the screw, on the downside of the U-shaped grip bar. The holder should point downwards. Fasten the holder with one washer and the knurled nut that you tighten with your fingers.
For a more secure holder attachment, avoiding the holder to unintentionally turn sideways, replace the knurled nut with the included stainless steel nut and tighten it with a 10mm spanner.
B4. For a more secure holder attachment, avoiding the holder to unintentionally turn sideways, replace the knurled nut with the included stainless steel nut and tighten it with a 10mm spanner.
This photo shows the light holder as correctly attached.
B5. This photo shows the light holder as correctly attached.

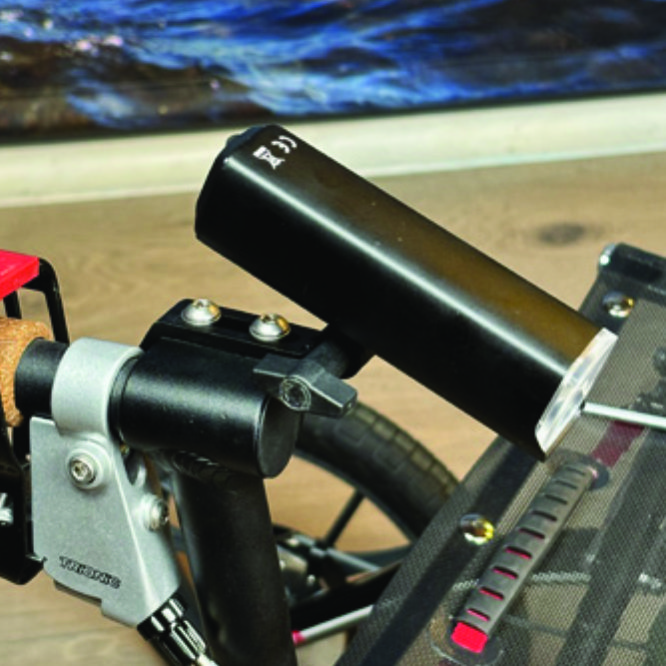
Attaching the LED Light to the Holder

Instructions for a Walker

Identify the circular front end of the light holder, with two slots for attaching the light.
A6. Identify the circular front end of the light holder, with two slots for attaching the light.
Push the slotted bracket of the light into the slots of the holder and make sure they are aligned. Seen in the traveling direction of the Walker, enter the included wingnut from the left and tighten it.
A7. Push the slotted bracket of the light into the slots of the holder and make sure they are aligned. Seen in the traveling direction of the Walker, enter the included wingnut from the left and tighten it.

Instructions for a Veloped

Locate the screw at the center folding hinge of the U-shaped grip bar of the Veloped. Unscrew the screw with the included 4mm allen key and remove it.
B6. Locate the screw at the center folding hinge of the U-shaped grip bar of the Veloped. Unscrew the screw with the included 4mm allen key and remove it.
Identify the circular front end of the light holder, with two slots for attaching the light.
B7. Identify the circular front end of the light holder, with two slots for attaching the light.

Instructions for Use

Overview

Caution

Caution

Battery Performance

Battery performance is significantly affected by temperature variations: •Low Temperature: At 0°C, capacity decreases by 5–10%, reducing operation time by 50%. At -20°C, capacity drops by 30%, potentially shortening operation time by 70%. Performance returns to normal when the temperature rises to 20°C. •Self-Discharge Rate: At room temperature, the battery loses about 1% of its capacity per day. When stored at 40°C, the self-discharge rate increases, leading to a loss of approximately 5% of capacity per day. To maintain optimal battery performance, avoid exposing it to extreme temperatures and store it in a cool, dry place. If you do not use the battery for a long time be sure to recharge the battery every 3 months.

Safe Mode

When the battery is low, the light will automatically switch to a 50-lumen high-beam safe mode, providing an additional 30 minutes of operation.

How to operate the light

Press and hold the switch for 2 seconds to turn the light on or off. Click once to cycle through modes, and double-click to enable ultra-bright mode (1000 lm).

The package contains

Charging And Powerbank

Customer Reviews

Dorothea Michel
Finally, some light!
The lamp is great, very bright, and the adjustability is fantastic. It's definitely worth the money.

General FAQ

Relevant Guides

Search help

Also Purchased Products

Product Reviews    

  • A rollator that gives security…

    I use my wife's Walker 14er in addition to the rollator I have owned for years. The stable construction and large wheels of the Walker 14er give a completely different walking feeling, a new sense of safety. The bumpy cobblestones and uneven terrain …

  • It has been a couple of months now since I first got my Veloped Trek.…

    After a few weeks of use, my foot no longer hits the front wheel and the problem I had with navigating the unit in tight corners in the climbing mode has ceased. I suppose it was simply a matter of accustoming myself to the unit that resolved these m…

  • Amazing!!…

    Here the Trek 14er comes in. Unlike regular rollators, it's designed to cope with rough/uneven terrain, it's sturdy enough to support me, yet still lightweight enough for me to lift in and out of my car etc. It has a seat for when I have to stop and …

  • Exactly as advertised, speedily dispatched, affordable…

    I ordered four inner tubes for 12 inch Veloped wheels, priced in GBP. They arrived from Sweden after only a few days, with no import duty to pay, all at an affordable price. They work perfectly within the existing tyres. Pleased with the result.…

  • My Veloped has changed my life…

    Since the operation to remove a tumour from my spinal cord, I can only walk with two crutches and this is a slow and painful process. I was finally told about rollators but thought they looked feeble and unattractive. My wish was to walk on the beach…

  • Mrs Vivienne Williams…

    My 12er Walker is great and has made such a difference in helping me walk much longer distances.

    I have back and left leg long-standing painful issues so trying to keep mobile is vitally important and this Walker is really helping me.

    I’m very…

  • I’ve worked in the care industry till……

    I’ve worked in the care industry till my retirement and have always been wary of walkers as they often look so unstable. All that changes when I spotted a Veloped in a magazine and started my research. I purchased my Veloped and have nothing but joy …

  • Mrs Lorraine Bone…

    The Veloped has been everything I hoped for. At only 59 I was keen to have something that looked modern and trendy whilst still providing me with the support I need when walking. I have used it for short trips to the shop and also on a riverside walk…

  • Very stable…

    My husband has a 12er Walker for inside and outside, but this one is really good for upstairs and visiting other houses. Compact with a small turning circle but stable and the brakes are easy to use. Very happy!…

Subscribe to our newsletter!